Monday, July 31, 2017

Mini Jacobs Ladder

Surprise!! I have even another quilt up on the design wall this week!!

it's called the Mini Jacobs Ladder - another tutorial from the Missouri Star Quilt Co - I think things are getting out of hand for me with their tutes..... just sayin'


This uses all 5 inch squares ( again) and there is no waste!  Well - I had such fun trying them that I posted it to my Colorado QOV'ers and my group got busy - I think 30 of these 72 blocks were made by me - so I am not really all that impressive - But!!! these blocks were all pieced with 5 inch squares from my never ending bucket - so there is that!!


and just for grins and giggles - check out these clouds - they were wispy along my walk and I loved the color contrast:


Linking to:
Design Wall Monday
Monday Making
Main Crush Monday
Moving it Forwards

Friday, July 28, 2017

Blue Scrap Progress - Rainbow Scrap Challenge

Blue is the Color of July on the RainBow Scrap Challenge ( hosted by Angela)

I dug into my 5 inch blue squares, and had so much fun!! and Then - Clare came and made these red and blue blocks - and she made 4 of them - so I just had to put them as the cornerstones.....

and Ta-Da!!


A quilt is born.... or at least in the gestation process.....


It is actually all stacked and ready to be *rowed* on my sewing table.... so it will soon be ..... a Top!!

I just love this Churndash Pattern - its the one by Missouri Star Quilts - where you use all 5 inch squares - No waste!!!

Linking to:
Finished or not finished Friday .... Obviously the not finished part - ha ha
Can I get a Whoop Whoop   cuz it really needs one... its friday, its worn out from all of its glory on the design wall.... it just wants to watch netflix and eat popcorn..... really.....

Rainbow Scrap Challenge - Even thought is has some other colors.... it started out as all blue!

Wednesday, July 26, 2017

Mystery A6: A QOV Mystery: Clue #3

PS!!! If you copied this this morning  read through again - a change has been made in Step 1 part 2. THis change was made at 3pm colorado time - thank yoU!!

Clue # 3
Light #1 (or White in my Example)


Cut
1.    1 – 9 ½ inch Strip Width of Fabric
a.    Sub Cut into 4 - 9 ½ inch squares

2.    1 – 10 inch Strip Width of Fabric
a.    Sub Cut into 4 – 10 inch squares
3.    1 – 2 ¾ inch Strip Width of Fabric
a.    Sub Cut Using your Easy Angle Ruler – into 8 pairs of * Wings* ( like in clue 1 and 2)
IF YOU DO NOT HAVE AN EASY ANGLE: Cut 8 - 3 1/8 inch squares, Cut them on the diagonal for 16 *wings*

4.    Cut 2  - 5 inch squares ( I got one out of my scrap, and one out of the yardage)


Step 1
·         Take 3 of your 10 inch Light Squares, and 3 - 10 inch Background Squares.
o   Draw a diagonal on the back of one of them, stitch ¼ inch on either side of the line, slice and press open
·         Take 1 10in square of Dark #2 from Clue #2, take 1- 10 inch square of your light, and cut them down the diagonal. Pair these two together – stitch ¼ inch and press open - resulting in ONE HALF Square in Dark #2 and Light

·         Take the left over Light ½ square – take your left over ½ Background square ( from Clue#2). Pair these two together – stitch ¼ inch and press open


Step 2
Take your *Light Wings* and pair them with the 8 Background *Geese* ( cut in Clue 1) and make 8 flying geese.


Lay them out to make 2 Sawtooth Stars and stitch


*At the end of this clue you should have
7  - Light/background ½ squares
1 – Light/Dark #2 ½ squares
4 – Light 9 ½ inch squares

2 – Sawtooth stars – measuring 9 ½ inch 


For a PDF Version Click:   Quiltygirls Craftsy Store - Look for Clue #3


******  Let's do a Double Link up!! Link up your Mystery Prjects, as well as any other QOV projects you have made in the Month of July!! Let's have lots of Eye Candy!!  *******


*****


Sunday, July 23, 2017

Design Wall Monday!

Well it is really Sunday night as I am writing this cuz guess what??? I will be up early tomorrow - and I may forget! And then! I will be sad......

This is what is on my Design Wall Right Smack Now:


I think this is the final Layout - these are the Block Drive Blocks called the Log Cabin Triangle - all of these had the triangle turned opposite that the pattern - and Yet!!! I LOVE them!!!  Found a whole new way to use them!!!


And then Clue #2 - mine is all finished for my A6 Mystery 


This is the original That you are seeing in the clues:


and this:  ( Below)
Is my next one that I am stitching along with you!!
I switched up my colors a bit - so I could have fun too


And look
It's us!
We had a date night....

We weren't needed to chauffeur kids around
and the boys did all the chores
and they cooked them selves dinner
  and it felt really really weird 


I may have to go have another kid
Or cry in the corner????


Enjoy!!!

Friday, July 21, 2017

Quilted: Finished Friday

I love it when I get to see other peoples interpretations of the Mystery Quilts that I design - and this one was so awesome!!

BWalsh - a Member of our Military Quilts 4 Mystery sent me this one of Mystery A2 - Now called Migration   ( available Here: Migration Pattern   )  ... Its on the Right


I just LOVED the colors that B used - and it is just amazing


This is a close up of the back and the quilting - I had a blast quilting that!!!


and then the quilt on the left - was made by Fern and her group
the pattern for this block can be found here:

again a pattern by me ;-)
I love seeing quilts that people make using these patterns!!


Enjoy!!!


Wednesday, July 19, 2017

Mystery A6 - A QOV mystery Clue #2

Clue #2


Dark #2 – Or Red in my Example


1.    Cut 1 strip Width of Fabric 9 ½ inches Wide
a.    Sub Cut into 4 – 9 ½ in squares
2.     Cut 2 WOF strips 10 inches wide
a.    Sub Cut into 8 – 10 inch squares
3.    Out of your scrap – cut   1  - 5 inch square
4.    Cut 1 – 2 ¾ inch WOF strip
a.    Use your easy angle ruler and cut 4 pairs of Wings
IF YOU DO NOT HAVE AN EASY ANGLE:   Cut 4 - 3 1/8 inch squares and Cut them on the diagonal for 8 *wings*

( ps the photo is missing the 1 - 5 inch square)


Step #2
1.    Take 5  Dark #2 10 inch Squares and 5 of your  Background 10 in Squares
a.    Draw a line diagonally on the back of the Background squares
b.    Stitch ¼ inch on each side of the line
c.    Slice and Iron.    Open


2.     Take 1 Dark #2 10 inch square and 1 Dark #1 ( navy in mine) , cut them diagonally , save the extra halves, and stitch one half together into a Dark #1 and a Dark # 2 square
3.    Take the remaining ½ square of Dark #2, and a 10 inch background square, cut on the diagonal, stitch together as a ½ square.


Step #3
1.    Take the 4 pairs of wings, and pair them with 4 of your background *geese* and make 4 2 ¾ inch by 5 inch flying geese
2.    Grab 4 background 2 ¾ inch squares, and your 5 inch Dark #2 square
3.    Make a Sawtooth Star


You should have
*1 Sawtooth Star
*11 Dark #2/BG ½ squares

*1 Dark #1/Dark #2 ½ square


For the PDF file you can find it here:    Alycias Craftsy site - look for Clue #2

*******  And feel free to link up your blog posts, *******


*****


Monday, July 17, 2017

QuiltyGirl: Mystery A6 Clue #1 Finished

Got my Clue #1 done for the Mystery A6!!  I am doing another one ...it was just so much fun!

So for the Mystery Pattern that you are all following:


Dark #1 is Navy Blue and my Background is Teal


And for the Second one:
My Dark #1 is Navy Plaid and the Background is Creamy White ( Thanks Kim B!!)


All the clues can be found under the Tab above Mystery A6

Come Back Wednesday for Clue #2 !!!  And to link up your results from Clue #1


PS - If you are posting Photos to Instagram and use the hashtag #MysteryQuilts4Military   or #mysteryA6 I can check out your photos!!!

Enjoy!!

Linking to:
Design Wall Monday
Monday Making
Main Cursh Monday

Saturday, July 15, 2017

Chicken Corn Salsa

I have another recipe for you to try - This one is a Dump in the Crock Pot, go sew for 4-6 hours, and tell the family how very very hard you worked to make this yummy meal for them.

And the next day serve it just a bit different - and you have TWO days to Stitch!!!

PS - Remember - Not a professional chef, nor even a really adventurous eater!

Chicken Corn Salsa


Ingredients:
1 - 16 oz Frozen Corn - I use the Super Sweet , or someitmes I get the Petite Sweet White Corn
1 - Can of Rotel
1 - Can of Black Beans ( drained)
3-4  Frozen Chicken Thighs


For later:
Sour Cream
Guacamole
Shredded Cheese
Taco Chips
and for day 2 - Taco shells


In the Crockpot
Put in the Frozen Chicken Thighs
Put the corn in on top
Next dump in the beans
and pour the Rotel on top

Cook on Low 5-7 hours or on high 4-5 hours   ( in the summer mine is done in 4, winter 5 and I have no idea why)

Open the lid, and shred the chicken


It is now ready to serve

The first day I put out Taco chips and all the other stuff and let them make Nacho salad type meals


The second day I heat up taco shells - and voila - Tacos!!

So there you go!! You have a LOT of time to stitch now right???

( can you tell food is one of THE most important things in my household this summer - with all 3 boys and the visitors around???)

Friday, July 14, 2017

Great Escape Mustang Sanctuary

I really love this Great State that I live in!! I love exploring all that there is to do..... and so

We took an adventure to:


It was pretty cool!!

First we took a tour of their ranch facilities, and saw the horses in action. Some of the Mustangs are being gentled for Adoption, or have been adopted, and these trainers are working with them.

Or - as is the case here, one of the wild mustangs gathered was pregnant and they were awaiting the birth of this little beauty::


Isn't she just the cutest?  We wanted her!! she is only one month old - and so adorable.

After the Headquarters tour we headed out to the sanctuary - and oh man - is was so cool. You all may know I sort of love horses, and there were 25 or so of them - lotta love for me!!


This guy wanted a treat - he came really close to us.
 

and then - these two 
They did not want to be left out 
they saw all the commotion and came running


and check out the 'do on this one!
Is that not comical???


They roam on an over 800acre pasture and are so content

This is Milk Chocolate
Dark Chocolate
and White Chocolate

I named them....
I am sure it will stick!!
( right???)

 The one on the left
Looks just like my Brother in laws horse
It was kinda wierd.....


They have an old windmill
it used to pump water until the created a pond
But I liked it!


and then!
As a part of my Photo Challenge Group
we were supposed to take a High Key photo
So I experimented with this barn
I think I got pretty close to the description of High key


This is their logo


I don't know 
there is just something about watching horses move that is just mesmerizing


All in All it was a great Adventure
the land was purchased by the owners father with the intent of helping
provide a sanctuary for these mustangs that aren't really adoptable,
and to help the other Mustangs get adopted out to loving homes


and now I want one.... or six.... six would be good, I could get them in all colors and have a horse rainbow!!!  and.... maybe the baby - ya.... the baby

Wrangler Man sort of threw me in the car and locked the doors.....

I just don't know why???

Wednesday, July 12, 2017

Mystery A6 - A QOV Mystery - Clue #1


CLUE #1


Dark #1  ( Or Navy Blue In my Quilt)
1.    Cut 1 – 9 ½ inch strip Width of Fabric
a.    Sub Cut into 4 – 9 ½ inch squares
2.    Cut 2 – 10 inch Width of Fabric
a.    Sub Cut into 8 -10 inch squares
3.    Use one of the 10 inch square blocks – and cut 1 -  5 inch square.


IF YOU ARE USING AN EASY ANGLE RULER
4.    Cut 1  2 ¾ inch Strip Width of Fabric
a.    Cut 4 pairs of *Wings* using your  Easy Angle ruler
b.    OR!!!  If you are super scrappy  - you can cut these out of your leftovers from the 9 ½ and 10 inch blocks.
IF YOU ARE NOT USING AN EASY ANGLE:
Cut 4 - 3 1/8 inch squares and Cut them on the diagonal for 8 *wings*


Background Fabric (or funky teal in my quilt)
1.    Cut  4 – 10 inch strips width of Fabric
a.    Sub cut into 10 inch squares
2.    Cu t 4 – 9 ½ inch strips width of fabric
a.    Sub Cut into 9 ½ inch squares
3.    Cut 1 - 2 ¾ strip width of fabric
a.    Sub cut into 16 -  2 ¾ in square
                                             I got 14 squares from my strip, and used the scrap from the large squares to cut the last two.


IF YOU ARE USING THE COMPANION ANGLE
4    Cut  2 – 2 ¾  Strip WOF
a.    Sub Cut into 8 pairs of *Geese* using your Companion Angle Ruler

IF YOU ARE NOT USING A COMPANION ANGLE RULER
Cut 4 – 5 11/16 inch squares –Cut along the diagonal both ways ( so you come up with 8 pairs of *geese*
:


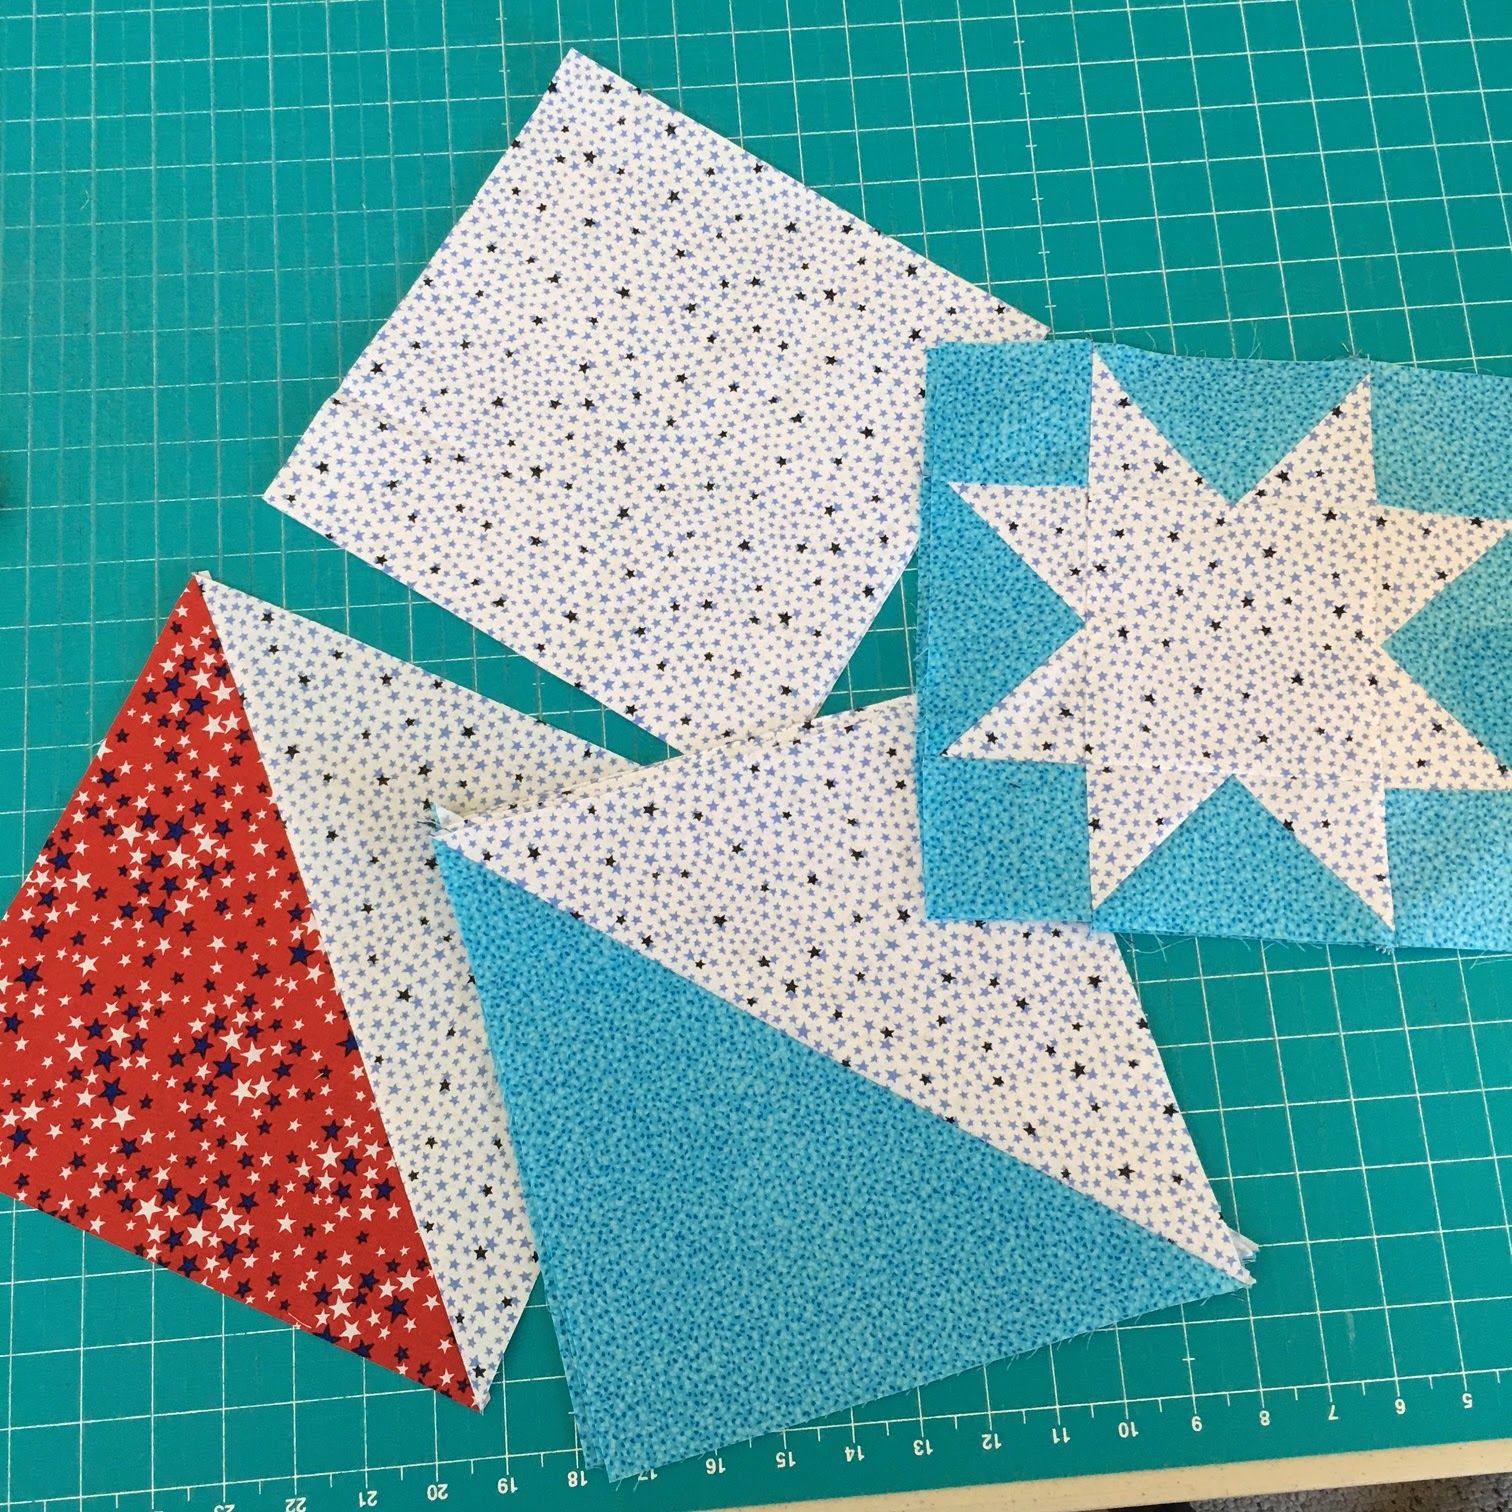
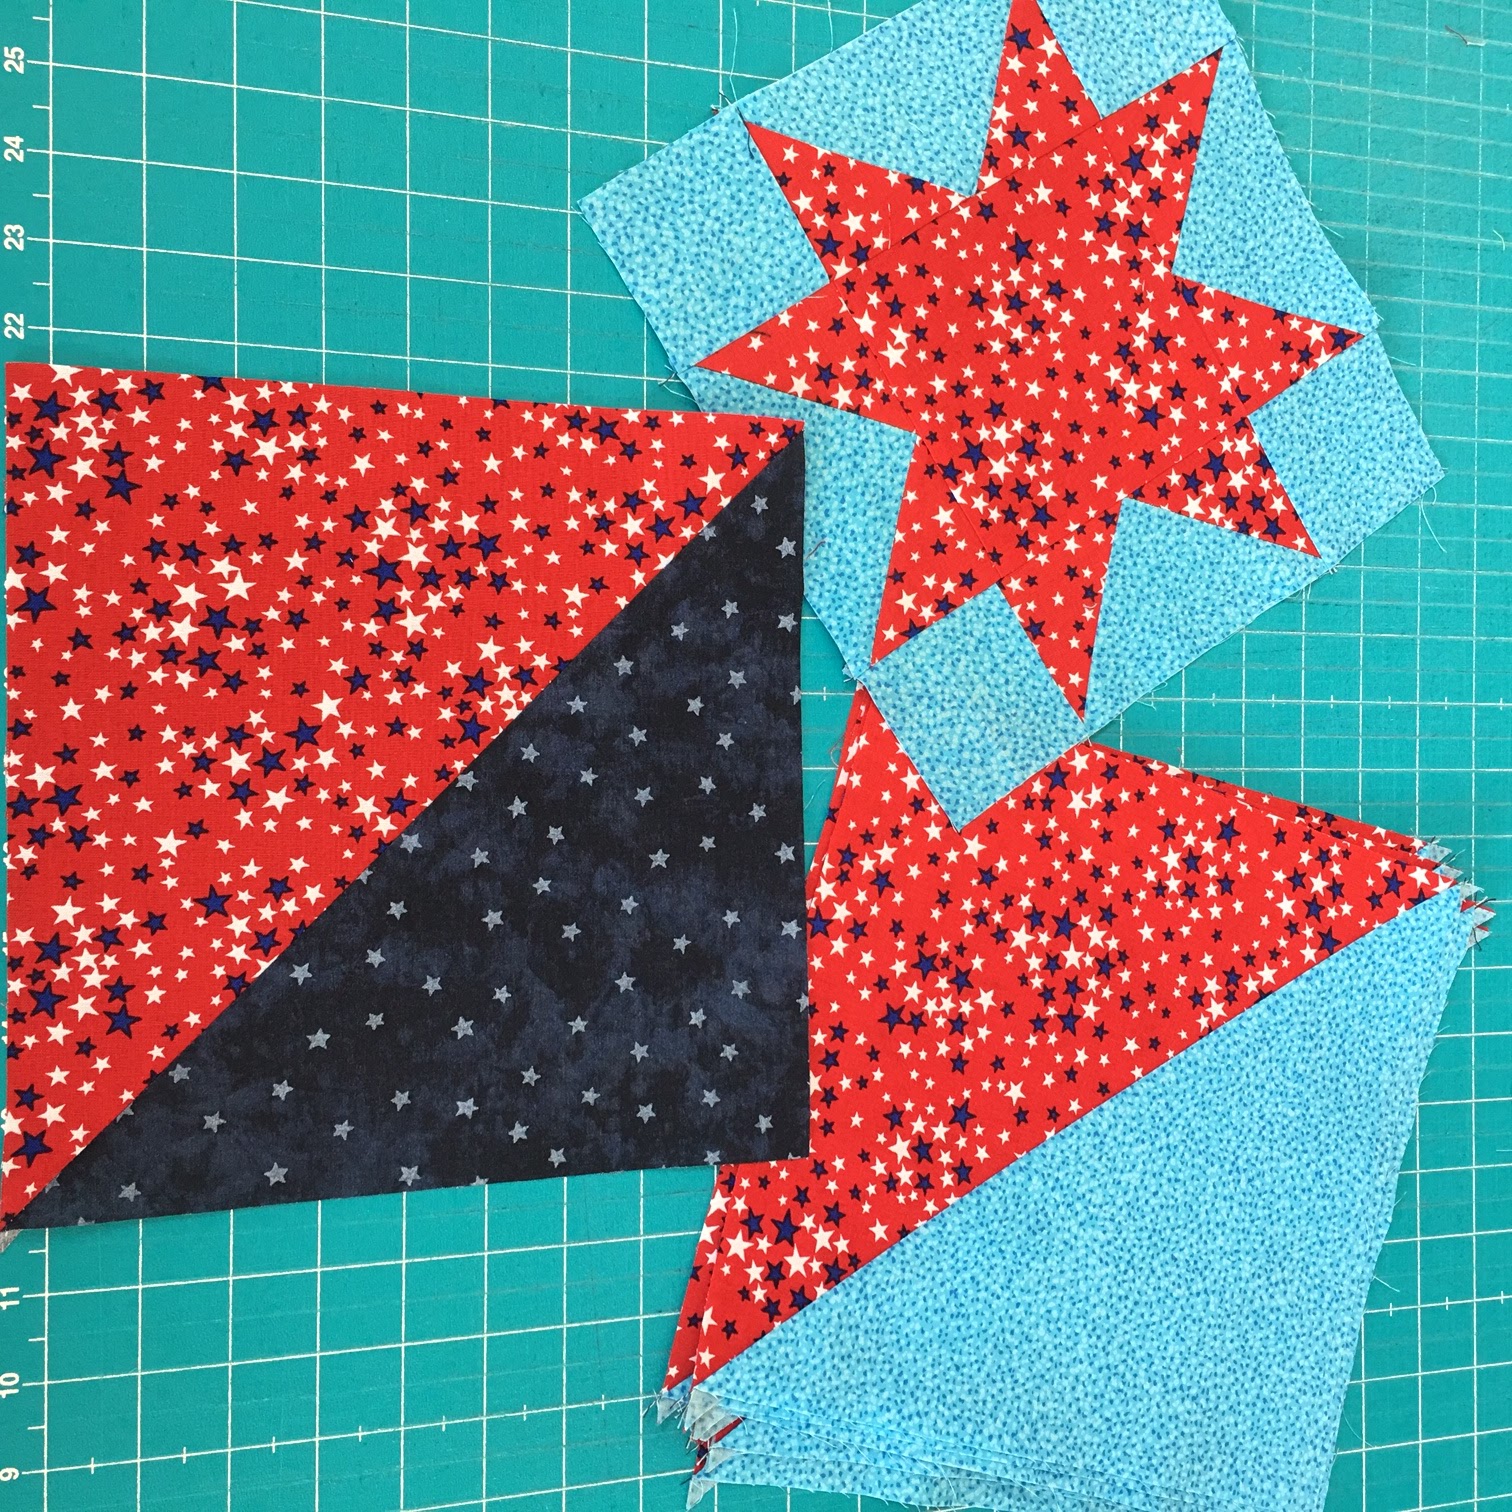
You should have this cut from your Dark #1 

And this ( over to the right) from your Background 


Step #2
Take 6 of your 10 inch background squares and 6 of your 10 inch Dark #1 squares. Draw a diagonal line on the back of your background square. Stitch 1/4 inch on each side of the drawn line, Slice.  Press

You will have 12 – 9 ½ inch Half Squares


Step #3
Grab 4 (or 2 pairs) of your Background *Geese* and the 4 pairs of Dark #1 Wings.
Stitch them into flying geese. Your geese should measure 2 ¾ x 5 inches

Take the 1 Dark 5 inch square and 4 of the background 2 ¾ inch squares

Lay them out like this and stitch together.

At the end of this clue – you should have one 9 ½ inch Sawtooth Star, and 12 - 9 ½ inch half squares.   The extra's that you have cut will be used for future clues - so save them ;-)


You can also find the PDF version in my Craftsy Store ( for free)


*******LINK UP ******


****


Linked to: