Showing posts with label gluten free cooking. Show all posts

Sunday, December 14, 2025

Pumpkin Alfredo Pasta

 I tried a new Pasta idea... 

are you ready?


Pumpkin Alfredo Pasta

  • *12 oz pasta ( I used Gluten free Barilla Pasta)
  • *1 Cup Pumpkin Puree ( from my Pumpkins!! - and it was FRESH - I made it that morning)
  • *1 Cup Cream
  • *1/2 cup parmesan
Cook the pasta according to the package

In a pan - Stir the Pumpkin and Cream, I cooked just to a boil - stirring it over medium heat until that boil started.  Then !! 

Tossed in the Parmesan cheese to melt in the mix - and poured it over the pasta!!


Ta da!!!  it was yummy and of course, I ate it as is, my guys added a steak to the side


Find me at all these places:


Etsy        Instagram      Facebook       Amazon

(ps - a commission is earned on purchases from amazon thru my link)

Sunday, November 23, 2025

Mexican Curry with Beans and Rice

 Okay - this isn't really a Curry - but that's what my family called it....


So!! this is a made up meal - but we ended up really liking it. And my Son jokingly called it Mexican Curry.... and my husband said we have to call it that so when he wants it again - I know what he is talking about:

Mexican Curry:

Ingredients:
Small Onion diced onion
1 1/2 cups Diced Brussel Sprouts ( I know!!)
1 cup Baby Spinach Chopped
2 Cups pre cooked chicken
15 oz Red Enchilada Sauce
3/4 cup Plain Greek Yogurt
1 Cup Shredded Mexican Cheese

Sauté the diced onion about 5 minutes -then add the Brussel Sprouts
Cover and cook for about 3-4 minutes with a little water and the lid on it.
Then Stir in Spinach and Chicken - and if you like spices.... those 

Transfer to a casserole dish.
Mix the enchilada sauce with the yogurt
Pour on top and mix up in the casserole dish

Top with Cheese 
Bake at 400deg for about 15 minutes


Spanish Beans and Rice:

1 Can of Mexican corn (15 oz)
1 can of Black Beans ( 15 oz)
1  cup chicken broth
1 cup mild salsa

Put it in the pot and bring it to a boil
Once its boiling  - remove from stove and  Pour 1 1/2cup of minute Rice in . cover for 10 minutes. then fluff with a fork!


I served the casserole on top of the rice... and voila - a yummy meal with a funny name!!

Find me at all these places:


Etsy        Instagram      Facebook       Amazon

(ps - a commission is earned on purchases from amazon thru my link)


Sunday, November 16, 2025

Zucchini Soup

 I may have mentioned that my husband gardens?? Did I mention that he planted 27 Zucchini plants this year?   Did I mention that I am learning LOTS of new ways to use said Zucchini???

This is SOUP!!!

i shredded a ton of it over the summer and froze it - so!!

I got out my trusty crockpot and tossed in: 

  • *5 cups of Shredded Zucchini
  • *3 diced Medium potato's ( I did not peel them as they were those soft yellow potato's)
  • *2 cups of Chicken Broth,.

I cooked it on Low for about 5 hours - then - I turned the heat up to high and added 

*1 8 oz Block of Cream Cheese

Cooked it for 25 minutes 


Then I stirred it up -  I probably should have used my hand blender, but it was soft enough to just stir. I think if I had used my Hand blender the cream cheese would have smoothed in faster. 

We were kind of starving, so we ate a bowl - by the second bowl all the cream cheese had melted in.

But! In our defense we had been out riding for 4 hours, and it was actually chilly that day - Not Winter cold yet - but chilly.... .


And we had a grilled cheese sandwich to go with it 
That was NOT a Bad way to use Zucchini!

Find me at all these places:


Etsy        Instagram      Facebook       Amazon

(ps - a commission is earned on purchases from amazon thru my link)

Sunday, November 09, 2025

Cottage Cheese Pizza

I know - that does not sound too appetizing I am sure - but!!

In my never ending quest to make food that I can eat and that I like... I had to attempt this.

and then!! I forgot to take a photo before we tried it - but it looked prettier.. oh but heck fire was it YUMMY!!!!


Are you ready for what I did?

Cottage Pizza Crust:

  • 1 Cup Cottage Cheese
  • 2 Eggs
  • 2 TBSP Flour ( I actually used Gluten Free Bisquick cuz that's what I had on hand and not frozen) 
  • 1/2 c Parmesan Cheese (the real cheese, not the stuff in the green jar)

I mixed it all together - and I just used a Spatula to mix it, no blender or anything. But I mixed it well and then spread it on Parchment paper on a cookie tray. I spread it just under 1/2 inch thick.  Next time I am going to try it thinner and see what that is like.

Baked it in the oven at 400deg for 20 minutes .

took it out and spread some Pizza sauce, mozzarella, Canadian bacon and olives - you know pizza toppings of your choice

Popped it back in the over for about 9 minutes and bam!!! Pizza that was yummy!!!

Oh!! and I made K try to pick it up like a real pizza piece - and it worked!!! the bottom got kind of pizza like. 

Full disclosure - most that I have tried so far have to be eaten with a fork - so that was cool to try!


If you try it let me know what you think. just remember I have been a Gluten Free pain for 20 years, and I have no idea what wheat flour pizza tastes like anymore. haha!!


Find me at all these places:


Etsy        Instagram      Facebook       Amazon

(ps - a commission is earned on purchases from amazon thru my link)

Sunday, November 02, 2025

Pumpkin Puree

 This has been the *Summer of the Garden

You all.. it grew crazy - and I traded a few zucchini for PUMPKINS!!

This is my first time ever trying to make Pumpkin Puree. I use pumpkin a lot - in Stews, Chilis and... IN PIE!!!

I asked my neighbors how to do it - and!! I did it!!

First - I cut the Pumpkins in half and!! I scooped out the GOO.... I did it - the goo is gooey, and I don't like gooey - but I did it!!!

I even saved the pumpkin seeds.. more on that later!

I placed them in the over at 350F for about 40 minutes, there was a bigger pumpkin that took longer. But I got them Fork Tender, and then!!

I let them cool about 10 minutes and peeled away the skin.

One was easy, the other.... it made me work for it!!!

I had a few little burnt pieces, so I did not use those. 
I placed the pumpkin pieces in a bowl that I could use my Hand Immersion Blender in . ( affiliate link) 

I learned (on accident) that you don't want to use the immersion blenders in a metal pan.... it scraped the non stick finish ( sigh) 


Then I blended, and blended - and really - it wasn't that hard...


See???? it wasn't hard at all!!!

Then!!! I had all of this!!

I started to look at Pumpkin pie recipes and they say you need 2 cups per pie - I was going to store them in Ziploc bags... but I got a wild hair!!


Look what I found!!


I am so ready - you freeze them and pop them out , then put them in the bag. SO much easier when it comes time to defrost. I won't have to squeeze the bags!!

And they are pre measured - so you don't need to dirty a measuring cup as well!! WIN WIN!!!


I am so excited!!! So excited in fact, that I have 6 more pumpkins to do  - and we will have food all year. Okay - maybe not all year, but heck fire!! We will have variety in our veggies!!


Find me at all these places:


Etsy        Instagram      Facebook       Amazon

                                                                                       (ps - a commission is earned on purchases from amazon thru my link)

Wednesday, August 07, 2024

Jelly Roll Sew Day Rail Fence idea....

 In September our QOV group is going to do a Jelly Roll Sew day - you know September is the month of the Jelly Roll.... so This is what I have come up with so far....


From One Jelly Roll I can get 32 - 10 1/2 inch blocks - and use all of them this way.  I am going to measure my setting triangles and then will write up a quick pattern to get it to 60 x 80 . If your interested I will share here when I'm done - but I think this will make a great QOV quilt - and it uses the WHOLE jelly roll.

THE PATTERN CAN BE DOWNLOADED HERE ( whoo Hoo)

Also - I saw a video about preparing Freezer meals in the raw - and I thought - Hmmm.... that sounds cool. I don't want any of my veggies to go to waste. The first thing I made was:


Pan Oven Fajitas. I had too many bell peppers and onions and I didn't want them to go bad - so I put sliced them and added some mushrooms, a little celery and Beef Strips.  I piled it all in a ziploc bag, put some soy sauce and some Lime juice on it and froze it!

Two weeks later (last night)- we had this!! I just added sour cream and guac. I think I like how it turned out. I didn't waste veggies and I didn't have to really cook. 

Have you ever done this? Prepped all your meals in freezer bags? I'm not sure I'd do it for every meal - but it might be nice to do it with my extras - and not waste any food.

They recommended these bag holders :

have you ever tried them? I don't know that you'd need them - but then again - I spill  - A LOT - maybe it would help me not be so messy?


Find me at all these places:

    
Etsy        Instagram      Facebook       Amazon


LInking to:

Midweek Makers at Quilt Fabrications

Tuesday, August 01, 2023

La Gringa Salsa or La Salsa Gringa....

 You know - for those wimps like me!!!

My husbands garden is really producing this year - faster than last year I think!!

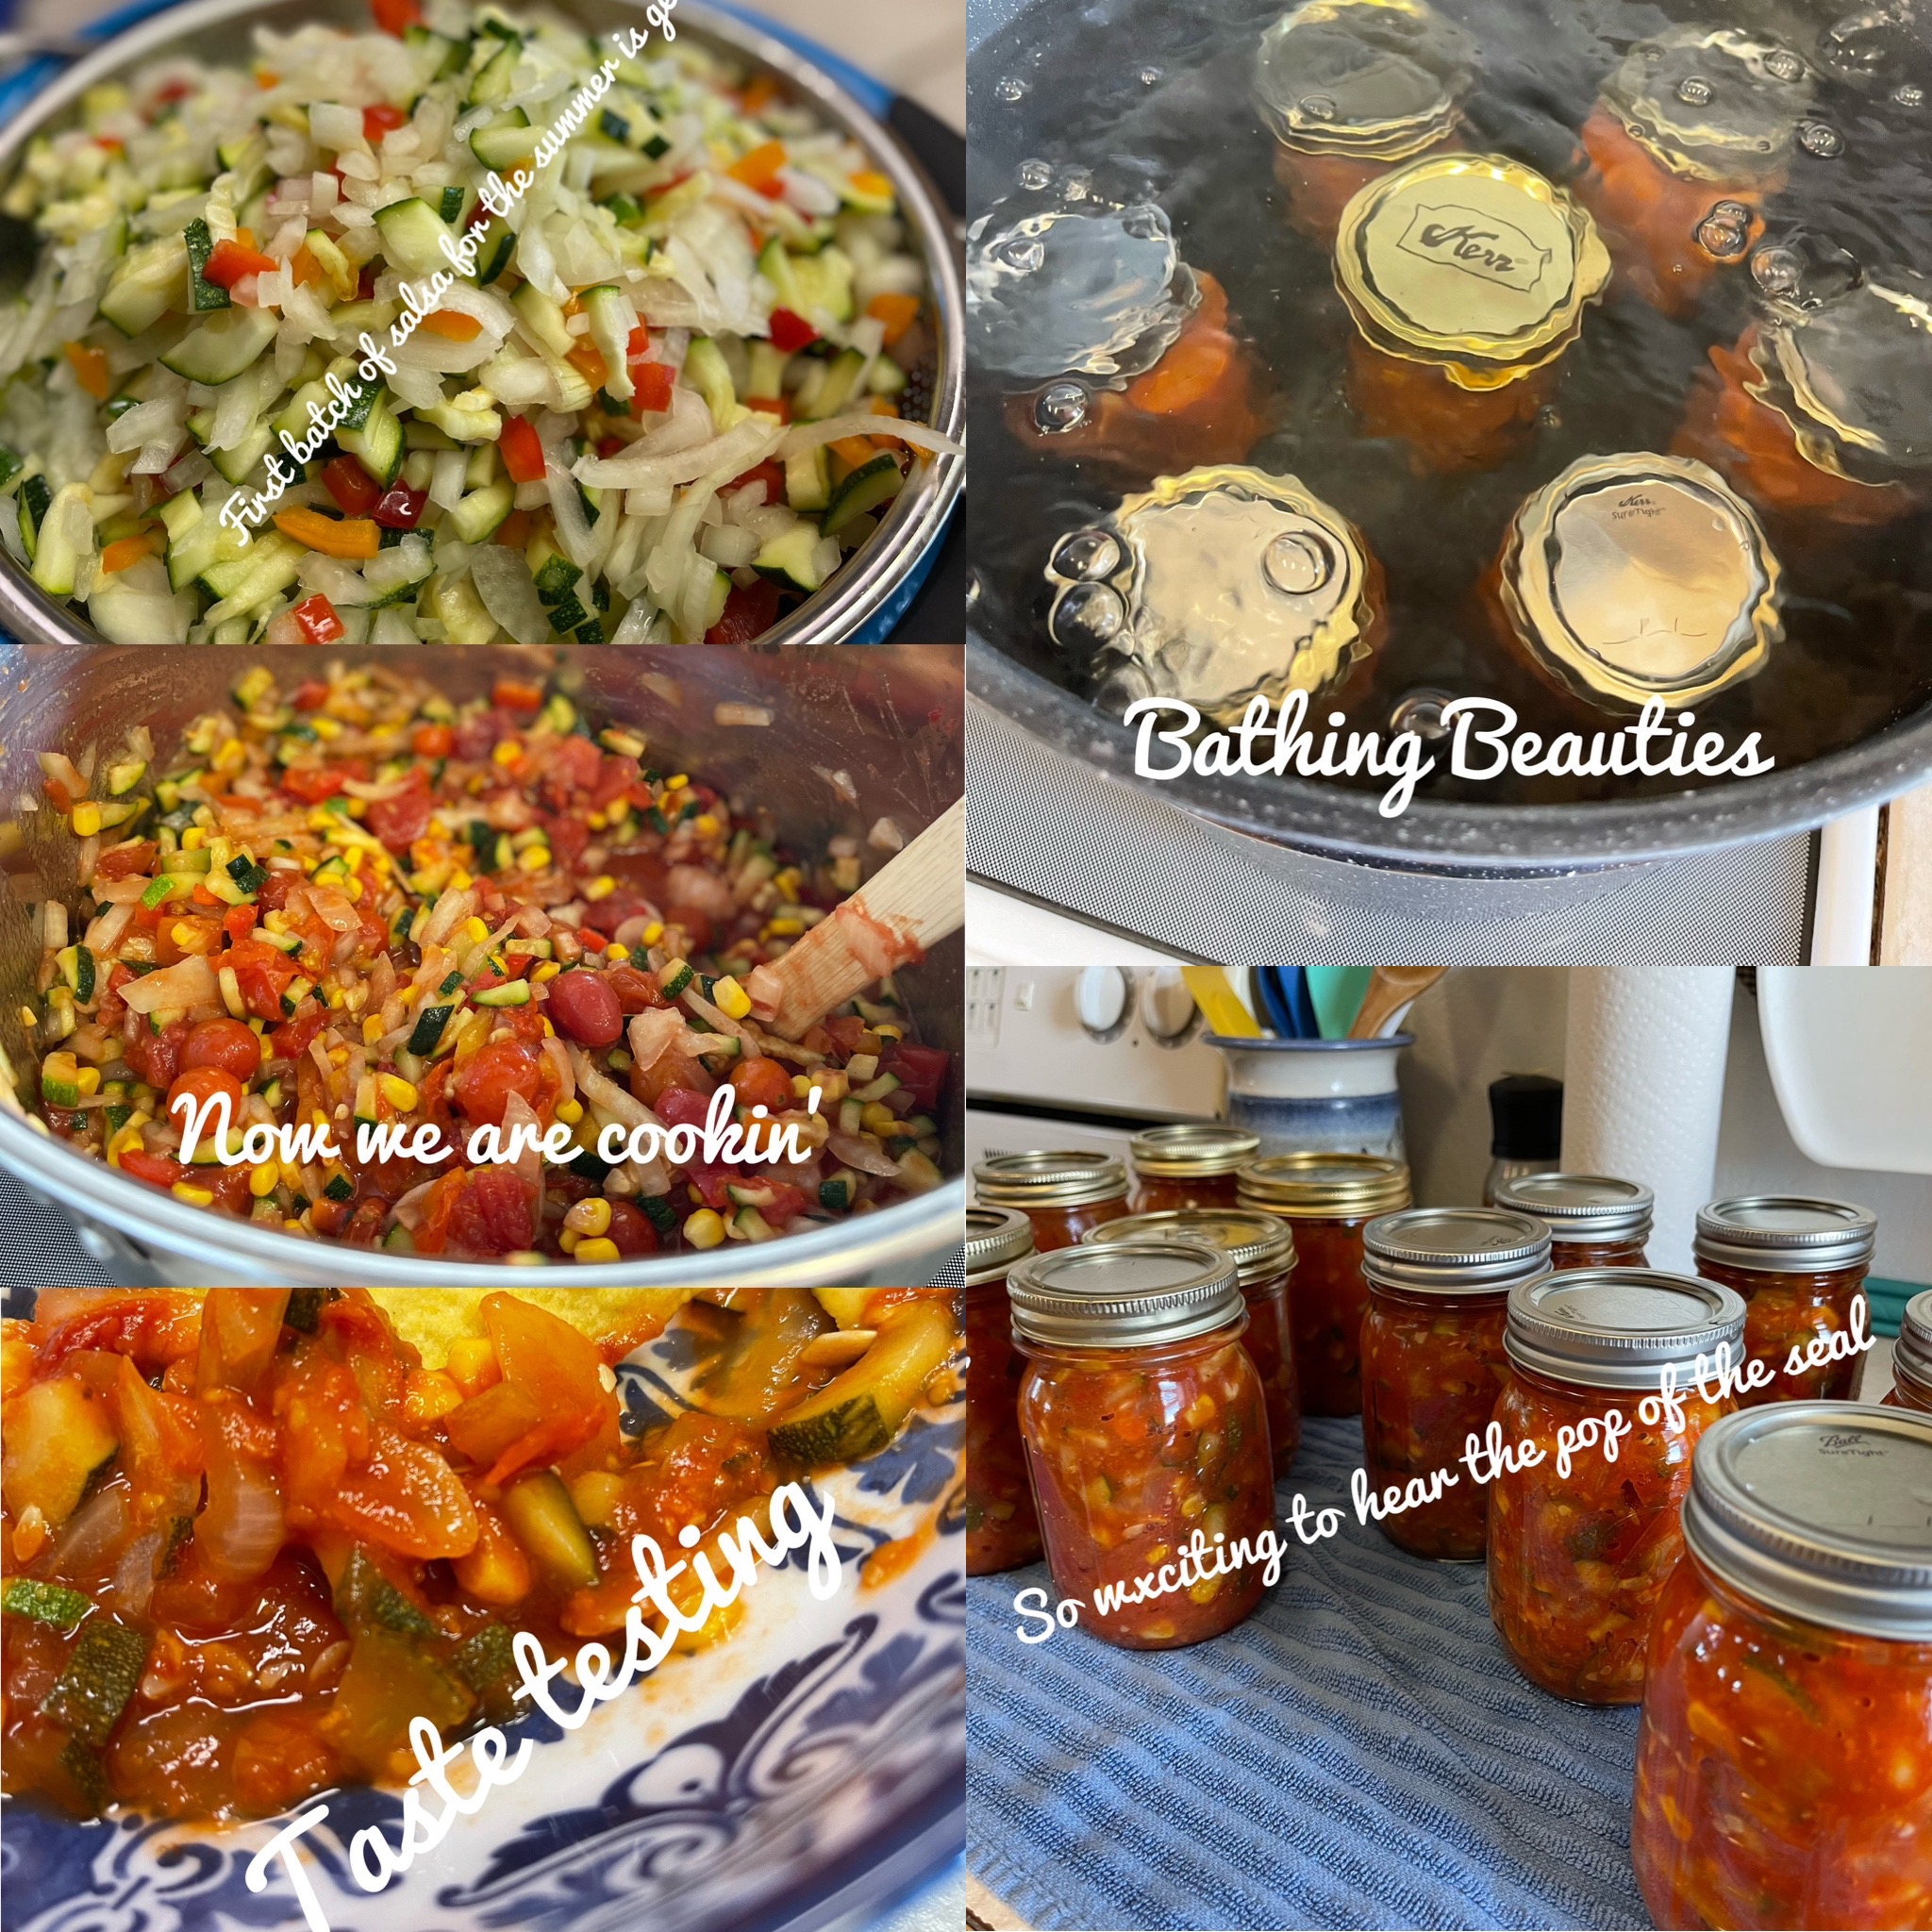
I decided rather than waiting for everything to overtake the kitchen - I would try to keep up - and!!

Made a batch of Las Gringa Salsa.... Its pretty yummy and for those that like heat - they can add in jalapenos in their bowl!!


Zucchini, Bell Peppers, Onions ⬆👆

Adding Corn and Tomatoes  ⬇

This batch made 14 Pints..


13 of the 14 popped... which was just perfect....


It left us a pint to taste test!!!


Years ago all the boys planted their own Zucchini plants and we were overwhelmed with them - so I learned a TON of Zucchini recipes!!!  This year ( finally) I think only 4 plants were planted - so even after this batch - I still have 4 left for eating...


That is , until someone looks in the garden again haha!!


Linking to:

My Corner of the World

Tuesday, July 18, 2023

Rhubarb

 My friend needed me to bring her a quilting supply, so when we went to get grain I made my husband swing by.... and he saw RHUBARB!!


He started talking with D about it, and then she said - would you come and pick it and take some of the plants home with you?  ( Please remember I am NOT the gardener of the family) K said yes!!

and so we found ourselves in a Rhubarb overload!!!


We picked the stalk's, we took some of the plants... Besides that box of Rhubarb - I had a black trash bag full of it. 

I wasn't sure I Like Rhubarb ... I don't remember eating it - so I diced a bunch up and make a Crisp before moving on...


I liked it!!!!

So I canned Strawberry Rhubarb Pie filling, and Rhubarb plain, and Rhubarb Jam... and now... we are in Rhubarb overload.... If you say the word enough times - it starts to make you giggle!!!


Linking to

Tuesday, June 20, 2023

Pulled Pork in the Instapot

We got the hankerin for some BBQ... Pork BBQ ( say that in your western cowboy voice like you are holding up a bank!! Its funnier!!)


I had a Pork Shoulder Roast in the freezer and I thought that would work just wonderfully! So I defrosted it away I went!!!


Mine was served without BBQ sauce on it, as I wanted to try a few different kinds.... and I dare say.... it was yummy!


So Step 1 - Defrost your Pork Shoulder Roast and cut it into pieces.
Cover it with Brown sugar and garlic.  I mixed the Brown Sugar, Garlic, and I also added salt - then rubbed it it on the pieces and let them sit for about 30 minutes.

( okay - truth... I had to go move horses real quick... so I don't know it that's a LEGAL step - but it all tasted so good - I think it should be)


Step 2: Get your Instapot out and hit the Saute Button - make sure you add about 2 tbsp of oil - I use Avocado oil


I have two utensils that I use a lot when using my Instapot - One is this Pigtail thingy - it holds on to the meat, and gives me a long handle so I don't burn , drop or splash oil. My husband also steals it from me for the BBQ - so I finally got 2!!!


I also use a silicon spatula. You can *scrape* the bottom of the insta-pot and it doesn't scratch it.


Step 3: By Now your oil is headed up and you will sear your meat - I did 2 minutes on each side and it looks like the Brown sugar  kinda caramelized this is good ;-)


Step 4: Make sure you turn the saute off, and cool it for a minute - then add a little bit of water to the bottom and use that silicon spatula to deglaze the bottom . you can use chicken broth or something else - but I just added about 2 tbsp of water...

STep 5: Then you put all your pieces back in the pot all snug like. and!!


Step 6: I poured 1 cup of cola over it. again  - you can used broth - but I wanted sweet!!!


 Step 7: Turn your Insta Pot to Seal....
Turn it to Pressure Cook - Low pressure, and set the timer for 60 minutes and GO QUILT!!!


Step 8:When you hear the buzzer go off, you wait 20 minutes and then turn that nozzle on the top to vent... and everyone comes running since is smells so good....

Then you pull the meat out a shred it - and wish you hadn't told your kids you were cooking because they all show up and there are no leftovers.... This!!! Is a dish I would eat leftovers of!!!

Oh!!! The boys took a scoop and mixed their BBQ sauce in it - I put the BBQ sauce on the plate like dipping sauce...

and I served Coleslaw, and corn an biscuits because I am nice to them....

Enjoy!!!

** The boys say to tell you I made them do work that day too - so they deserved to eat - Bah!!*


*Commissions earned on linked products*

Tuesday, April 04, 2023

Instant pot Chili

 A while back I got an Instant pot - and I LOVE it!!!! I can make so many things in it !! I still am a HUGE Crockpot fan... If you knew me in my pick up kids, and run to a gazillion hours of sport/ animal/ robot  practices days - you know I make a mean Crockpot lasagna, and well, just about anything.... 

So it is time to ramp up my Instant pot abilities.


It has saved me many times when I did not prepare anything for dinner.  


It has taken frozen meat and made us Fajitas, and soup, and baked potato's, and hardboiled eggs....

But!! I had a new plan in mind...


I wondered if I could make my Chili at lunchtime, and then leave it on the Slow cook mode, and still have a great meal in the evening.  

Spring is coming, and so we have a LOT to do outside, and lunchtime seems to be the time I am free to cook - evening finds me outside until dark.... ( even last night, with the threat of snow coming and awful million mile an hour winds.... I had things to do!)

So I made my Chili at lunchtime ( 1pm) planning to eat about 7:30 pm....

Ready?

First I turned the pot to sauté - and I sautéed Diced bell peppers and diced onions

then I added the raw ground beef, and sautéed it until cooked. we are beef eaters - I used 2 pounds.

I turned off the saute - and started adding:


 I had 3/4 of a jar of spaghetti sauce left from Sunday  night ( I made pizza!! go me)

Next came a can of Drained Kidney beans, and drained Pinto beans

It started looking yummy.... but you know - I had a bag of mini carrots in the Fridge, so I diced those and added.... oh!! and I had a bag of frozen corn... so I added it...

Stirred everything up.   I decided it needed a little more liquid... so added a cup of water. 

Closed the lid and hit pressure cook - set the timer for 15minutes

When the timer went off, I let the Vent come down for 15 minutes before releasing the vent.. and taste tested!!

You know what I forgot? Garlic....so I added a little Garlic Salt....

and turned it to slow cook ( with the lid on)

At 8pm - when we finally broke for dinner... I was HAPPY!!!


Yummy Chili in my Tummy!!!


Of course, we served it with Fritos, Shredded Cheese - and for me Sour cream


Chili is the one thing that I do LOVE leftover - so after we ate, we divided it up, and I have enough for lunch today and tomorrow!! Yay!!  ( ps! for both of us!!)


Here is a link to the Instant Pot that I have : Click here


Do you have a favorite Instant Pot recipe? Share it with me... remember tho - I am that Pain in the Tocus eater - can't have gluten, nuts, pineapple.... 


Oh yes, and I probably jinxed the weather - we woke up to snow.... and gloomy skies... 

A great day to stay inside and quilt!!!

Find me at all these places:

    
Etsy           Instagram           Facebook

Monday, February 27, 2023

Cooking Changes

 Sounds like a silly title right? Except.... go with me here...


I made Chili.... 4 days ago, and we just put 2 servings in the freezer for later. THAT NEVER HAPPENS!!!

When Child Number 1 left for college, nothing in the cooking department changed... the other children absorbed his portions.... 

When Child Number 2 left - we started having one serving of leftovers..... 

When child number 3 left - I cooked once a week !!!  Seriously! It was crazy....

Then in 2020 my Dad had a Heart attack - and he needed to eat more like a keto type diet - So I started cooking for us and for my Mom and Dad..... Sundays found me in the kitchen prepping our whole weeks worth of food....

Oh ya! and two of my children had come home because Covid closed their living arrangements....


( you get that I was back to cooking for 6 again right?)

Then as Covid restrictions lifted - the boys left me, and I continued cooking for 4 ( us and Mom and Dad)

My Mom passed away - and my cooking went down to three.... but just to be clear - I was cooking Dad 2 meals a day.. and he would eat out one meal - unless it snowed.

We have just realized we are back down to two, with the occasional addition of a kid (what do you call adult kids?)  and now I have to learn to cook for two again - or have leftovers for a year....

Husband likes Leftovers - I do not.... so there's that balance as well.....

All that to say - 


I learned a new recipe!!!


Its called Sheet Pan Fajitas - and it was good!! ( and okay, I even did eat one day of leftovers for this one)

1. Heat the oven to 400deg

2. Slice up Round steak ( or any beef for that matter, I had extra round steaks and I think this makes them more tender)  I used 2 pounds

3. Slice up 3 Bell Peppers

4. slice up 1 onion

Toss them all in a bowl and drizzle some olive ( or avocado oil) over them

Toss your favorite fajita seasonings.  I used Garlic, salt, a little adobo seasoning)

Spread them out in a layer on a cookie sheet and put in the oven for about 20 Minutes.

When I took them out I drizzled them with a little lime juice, and served them with tortilla shells ( corn for us, I am the gluten free one) and it was yummy!!! 

I just realized I don't have a photo....

But you will have to trust me, they were good. I bet you could use chicken too - but you know, beef ranchers - they prefer BEEF ;-)


Wish me luck in learning to cook for Two again.... or learning to like leftovers....