Makes a 12 ½ inch block
Uses 2 ½ inch strips
Cutting Instructions:
Color Fabric: Cut
2 – 2 ½ by 6 ¾ inch pieces
6 – 2 ½ by 4 ¾ inch pieces
2 – 2 ½ by 2 ½ inch
pieces
Background Fabric
1 – 2 ½ by 6 ¾ inch
piece
2 – 2 ½ x 2 ½ inch pieces
16 – 2 ½ x 3 inch pieces
Step 1:
Lay
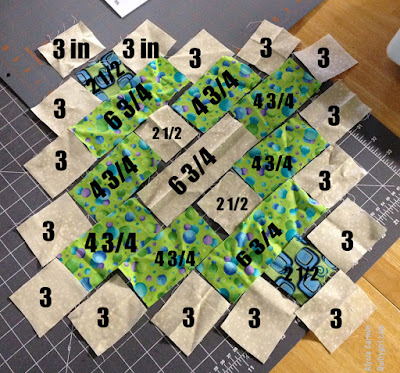
out your block. Because I cut mine all scrappy, I have been laying each block
out individually so I can sort of match up the color scheme – remember everything
is 2 ½ inch in width. The numbers on the photo are the length that you cut.
I pieced each row together – then pressed towards the dark .
 |
| folded in half, and finger pressed on the center |
My Grandma taught me a trick a few years ago when she was teaching me to sew garments. To make uneven seams you just do a little finger pressing.
 |
| Matching the pressed parts |
I
took each strip, folded it in half, and finger pressed the middle. Then when
you sew each strip to each other you match the pressed part and voila!
This is what your block should look like now:
I have a 12 ½ inch ruler. It has these ¼ inch marks on it –
so I place the ¼ mark right on the edge of the green and cut out my square.
I know that looking at it you all could probably figure out how to use half squares , but each time I tried that I came up short. Just an FYI
And Ta- Da ! A finished Album Block
I also wrote this as a pdf file and it is available in my Craftsy Store ( for Free)
If you make a quilt, or block, or have a quilt similar - I would love to see it - leave me your link in the comments or email me. I really love all these old timey quilts!


14 comments:
Thanks Alycia!!!
Got it - thanks for a great tutorial!
Bless your heart for sharing your PDF for the album block! This is on my list of projects I want to do...maybe this one will be one of my QOV "kits" for my next quilt retreat.
This block might be old-fashioned, but that doesn't lessen it's appeal, in mho. It's perfect for collecting signatures for a goodbye quilt/memory quilt, and it's great alone, without signatures! You did a great job on the tutorial!
Thanks Alycia, I'm going to try this!
Great tutorial! I want to make some right this minute! Both machines are busy, though!
I have wanted to make a quilt with these blocks but there hasn't been an explanation that I can understand till now! I am so thankful to you for sharing this block. I have a jelly roll of Glamping that I have saved and this will be a better pattern for me than the other pattern. I'm not sure of the name but lots of quilters were making it. It consists of many small 2.5 in pieces. I'm sure you know the name. Again, thank you very much.
Thanks for doing all the math. And for linking up with Oh Scrap! Love this block :)
Thanks for the tutorial! I'm going to remember this next year for the RSC 2.5 inch scraps. I might make each block with different fabrics but all the same color. Ok....maybe I won't wait and will try it out next month with my 2.5 scraps and see how it goes.
This is a great block. Thanks for your tute :)
Thanks, Alycia for this excellent tutorial, especially with the numbering of the blocks. I have way too many jelly roll strips this would be perfect for. I found you on Oh Scrap! , my first post here. This is definitely going in my want to do list. The big blocks will be good for charity quilts, which is my interest. Keep up the good work!.
Thanks.Great tutorial and easy to follow.
Thanks for the tutorial.
Saw a quilt with this block at the Calvin Coolidge Historical site in Plymouth Notch, VT. It was the original quilt on the bed where he was born in 1872. Love the pattern and wondered how to make this block.
Great instructions. Plan to use it with some old fabric of my grandmother's dating back to the late 1800's or early 1900's. Thank you.
Post a Comment