Dark #2 – Or Red in my Example
1. Cut 1 strip Width of Fabric 9 ½ inches Wide
a. Sub Cut into 4 – 9 ½ in squares
2. Cut 2 WOF strips 10 inches wide
a. Sub Cut into 8 – 10 inch squares
3. Out of your scrap – cut 1 - 5 inch square
4. Cut 1 – 2 ¾ inch WOF strip
a. Use your easy angle ruler and cut 4 pairs of Wings
IF YOU DO NOT HAVE AN EASY ANGLE: Cut 4 - 3 1/8 inch squares and Cut them on the diagonal for 8 *wings*
( ps the photo is missing the 1 - 5 inch square)
Step #2
1. Take 5 Dark #2 10 inch Squares and 5 of your Background 10 in Squares
a. Draw a line diagonally on the back of the Background squares
b. Stitch ¼ inch on each side of the line
c. Slice and Iron. Open
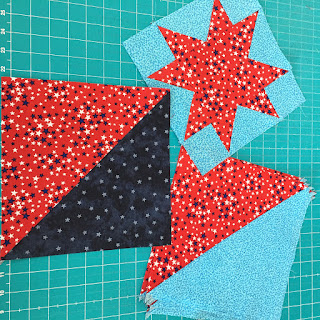
2. Take 1 Dark #2 10 inch square and 1 Dark #1 ( navy in mine) , cut them diagonally , save the extra halves, and stitch one half together into a Dark #1 and a Dark # 2 square
3. Take the remaining ½ square of Dark #2, and a 10 inch background square, cut on the diagonal, stitch together as a ½ square.
Step #3
1. Take the 4 pairs of wings, and pair them with 4 of your background *geese* and make 4 2 ¾ inch by 5 inch flying geese
2. Grab 4 background 2 ¾ inch squares, and your 5 inch Dark #2 square
3. Make a Sawtooth Star
You should have
*1 Sawtooth Star
*11 Dark #2/BG ½ squares
*1 Dark #1/Dark #2 ½ square
For the PDF file you can find it here: Alycias Craftsy site - look for Clue #2
******* And feel free to link up your blog posts, *******
*****


4 comments:
That red star really pops!
I'm still deliberating about how my fabric fits into your pattern. I normally choose and use, but since I changed the colors...
Another fun Monday's work for me! Thank you.
Love the fabrics you are using.
Post a Comment