Showing posts with label Not So Top Secret Project 2. Show all posts

Wednesday, November 18, 2009

From Denise in Colorado!!

This was a fun box to open!! I have a friend in Denver. We met a long time ago thru the internet.... and she is quite the quilter! She also has 2 of the most adorable daughters. I think if my boys play their cards right..... I'm just sayin'.....
~
Denise did the Not So Top Secret 2
http://alyciaquilts.blogspot.com/search/label/Not%20So%20Top%20Secret%20Project%202

project along with us - and used black setting triangles. I LOVE it!! She even quilted it on her domestic machine, and did an awesome job.
~
Next - she sewed along with the Quilt of Valor Mystery that turned out to be Chunky Churndashes from Bonnie Hunter. (Bonnie gave me permission). She quickly decided that it would be great to make two quilts with all those blocks - and voila - here they are!
~
http://alyciaquilts.blogspot.com/search/label/QOV%20SEW%20ALONG%201


And of course - these are quilted too! Didn't they turn out cool? Thanks Denise!


Monday, July 06, 2009

Not so Top Secret Project Two Part 6

Quilting the Quilt:
I quilted mine , and my youngest son quilted the Top my Mom made. So we are two more quilts ahead. But after the Quilting.... there is still one more step. You need to bind the quilt. There are lots of great tutorials out there. Instructions in Quilt Magazines and YouTube videos.
~
I use 2 1/2 inch strips for my binding. I measure the quilt ( eg 54 x 72) then I add 54 + 54 +72 +72+15 and that is the length of binding that I need.


~
I make a double fold binding. Then - because I don't like to do any handwork - I apply the raw binding edge to the back side of the quilt. Then I bring the Binding to the front and use a decorative stitch to sew it down.
~
Now if you are sending it to a LA'er and forwarding it this way - you don't need to worry about the binding. We will get it done here. I have been recruiting even more folks to do this process!!
~
Hope you all have a great day - a thunderstorm has just moved in - so I must sign off!

Sunday, June 28, 2009

Not so Top Secret Project Two Part 5

The Backing:
~
All quilts need a backing. I machine quilt my quilts on my Long arm - so I am going to give you the directions to have a quilt quilted by a Long Arm Quilter.
~
There are many different ways to make a backing.
This one was designed by Mary. I love it - I use it a lot, just to mix up the way a backing looks:
http://maryquilts.com/off-center-4-patch-backing
~
I also saw someone make a back out of 10 inch squares. It was very scrappy and added interest! Also I made some that were just strippy. And then there is the easiest way to do it - buy a wide backing. Then it is all one piece, no seaming!
~
Any way you decide to do it, Most Long Arm quilters prefer 6 to 8 inches extra of the backing. I always err to the side of caution and try for 8. This allows me a chance to square up the backing. Since I want a square quilt, and a non wrinkled backing I need to make it square to load it on my machine.
~
My Quilt Top finished at 54 x 74.
So this means if I will add 8 Inches :I want a backing of 62 x 82
If I Will add 6 inches it will be 60 x 80
~

Now you have your backing made.. you can move on to the quilting. Are you making this as a Quilt of Valor? If so - over at http://www.qovf.org you can click on Request a Long Armer. A form will come up , you fill it out, you get a reciept in the email, and within a week you will get a name and Email of a Long Arm quilter who will then add the batting and quilt it up with in a Month. Most of them do not do binding. These Long Arm quilters are volunteers and put these quilts into their schedules to do quickly!
~
If you use this option, they will send the quilt back to you, and then you bind it. You will then make a presentation case ( a pillowcase). When that is all done you can go back to qovf.org and request a destination.
~
If you want your quilt to come this way - for presentation to a soldier at Fort Carson. You can let your Long Arm'er know this and include my address. They can then send the quilt to me and my guild ladies, or my new trainees will bind it and get it to a soldier.
~
Do you need some great tutorials for a presentation case?
http://vickiwelsh.typepad.com/field_trips_in_fiber/2007/05/pillowcases.html

I know there are a few more - but I can't seem to find them at the moment.
~
Any questions? Let me know. I hope you all liked that pattern. I liked mine and am getting ready to quilt it up. So after I am done I will be back with it!

Tuesday, June 23, 2009

Not so Top Secret Project Two Part 4

Whoo hoo - are you getting excited?


First step - Lay your quilt out and place a straight edge ruler along it. I trimmed those little flanges off so I had a straight line to apply the borders.
~
Second:
Measure the top. I measure thru the center and on both edges. Then I take an average of the three to get a length. I have been told that this will help you square up the quilt. But I have to be honest too... not many of my quilts come up *perfectly* square.
`
My Top measured 44 x 59.

I then went back to my 2 1/2 inch scrap bin and chose a creamy print to make a 2 1/2 inch stop border. I made 2 strips 2 1/2 in x 44 inches long. Applyed them and ironed. Then I measured the next direction. Mine was 64 inches long.


I made 2 2 1/2 inch by 64 inch strips and applyed those. I ironed again.I ended up using a pretty busy cream print. But I like it!


~
Now for the border choices. When I first drew this up I put solid borders on the quilt. But when I looked at my strip bin, I thought - wow - if I use those for a strippy border I wonder if I could empty the bin? So I did - and you may not like how it looks. You may wish to do a solid border. Either way - the quilt will be a perfect Quilt of Valor size.
~
Option One: A Solid Border. You will need Approximately 1 1/2 yards of fabric. You will measure the top again. Mine measures 48 x 64.
`
Cut 5 1/2 inch strips the width of the fabric and make 2 48 inch long borders. Apply those and remeasure. It should measure about 74 inches. Cut more 5 1/2 inch strips to make 2 74 inch long borders and apply. Your top is done! It should measure around 58 x 74!


Option Two: A Pieced Border:
I started grabbing 2 1/2 inch strips and sewing them together in sets of five. You can sew them in any amount of sets, 5 seemed to work well.
~
After I ironed the sets, I then took them to the cutting board and cut them 5 1/2 inches wide. For the Top Border my strip set ended up being 23 strips long. So I sewed enough sets together to make a long border of 23 strips. I then applyed it to the top and ironed it.
~
Remember - I am not always the best sew - er so I had a little overhang... this is where rulers become my best friend. I just trimmed it up to square again! I did the same thing for the Bottom Border.


After the top and bottom borders were done I re- measured the top - it was 74 inches long. So I made 2 Strip sets. Mine ended up being 35 strips long. Then I applyed those, ironed and trimmed it up. And here is the final picture of the quilt top.


I still have a few strips left - but my bin is getting low on 2 1/2 inch strips. And the cool thing to me is that other that the setting triangles this quilt is really a "free" quilt so far. All the strips came from trimmings of other quilts, or left overs of other projects.
My top was 58 x 74 when finished. I will be back with the backing preparations and more info for you. So don't stop now ;-)

Sunday, June 21, 2009

Sunday's Post

Happy Father's Day!
I think that this might have been the first day in about a month that we didn't have to be up at 5am and start getting somewhere. It was very nice. My Middle son brought breakfast in bed to Wrangler Man. He made it all by himself!
~
Two people have sent me pictures of the center of their Not So Top Secret Project 2 quilts, so I thought I would share... I love how the same quilts can be done in so many different colors!

The first one is from my Mom. This is her first quilt on point - and I think she is doing well!!
~
Next is from Denise. I loooove the black in the setting triangles!
They probably didn't know I would use their pics - but they sent them and I thought - Oh that would be cool to share!! So thanks ladies.

***http://justalittlezizzy.blogspot.com/2009/06/alycia-quilts.html ***
Here is another one from Barb!! - Go check out her blog post! Loooove it!
~

Tomorrow I will post another step in the process.
~
The last quilt was made by Susan in TX and I quilted it. It got finished being bound and is ready for the next delivery of Quilts of Valor!
It is all fish, and it is awesome. Wrangler Man thinks that he wants to make a quilt like this.
~


Hope you all have a good one. We are heading out to the driving range to do some golf type related stuff... wish me well. I was a baseball player - and the swings are entirely different...

Monday, June 15, 2009

Not so Top Secret Project Two Part 3

Are you ready for Step 3? Please Remember - this is set on point because that is a challenge for me. Well Sewing straight is also a challenge some times - but I won't always admit that!


~


So we need setting Triangles. I used all the same fabrics and used 7/8 of a yard of red.


*First cut 3 ~12 1/2 inch squares of red. Sub cut them into 2 diagonals. ( Picture the square with a cut where the ruler is, and then a cut going the other way diagonally)
* Next cut 2 ~6 1/2 inch squares. Cut them once on the diagonal. These will be your 4 end caps.
~


So, because on point gets me sometimes I went and layed the first row out - so I could visualize. I will tell you how I did it, and immediately you all will figure out 7 bazillion ways to do it better. Please share if you do!
*First I layed out one of the endcaps pieces.


*Then I layed out the second row.
One setting triangle, one post, one 16 patch, one post, one setting triangle. I took that row to the sewing maching and sewed it up.
~
When sewing the setting triangle to the post, look at the picture - that is how I matched the ends and sewed. See how the bottom pieces line up? Match them that way ( trust me, it works)


I continued on and layed out the second row - blogger put it upside down, but the layout is the same.


I continued sewing the first three rows, and then I needed another piece. I needed a setting triangle with a post sewed to it. So I layed the setting triangle out where it needed to go, and layed the post on top of it. This way I couldn't get the post in the wrong place.
This picture the top is the 3 blocks, and I am working down from right to left ( so look at the picture a little sideways) ( Blogger is annoying me - I can NOT change it!!)
~
This picture shows how I lined the post up with the setting triangle. Then I layed this piece out with the rest of the row and kept going.


Remember I told you that one 2 1/2 inch x 8 1/2 inch piece would have 2 red squares sewn to it. This is where that piece comes in. You sew it to one of the 6 1/2 inch half triangle end caps. Here is how I did it. I put a pin in the center of the end cap, and a pin in the center of the post then matched the pins and sewed.


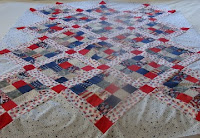
And this... it is the center of the top. We will add borders next - and you will still need your 2 1/2 inch strip box.
~
Please please please - if I missed something or said it wrong please tell me. I did a lot of laying out of pieces and thought it looked right - but sometimes the words don't come out properly. I really had fun trying to figure it out - and have a lot of respect for people who can "see" the on point layouts so easily!!
~Oh My center of the top measured 44 x 59 so far.

Monday, June 08, 2009

Not so Top Secret Project Two Part 2

Back to your 2 1/2 inch bin.
I used creams for the "posts" and Red's for the squares. I thought of using all the same cream, but I ran out - so now it is a lot of creams.
~
From the Cream - cut 48 2 1/2 x 8 1/2 inch posts.
Pick a red or 2 or 3 - cut 31 2 1/2 x 2 /12 inch squares.
~


Next - Sew one 2 1/2 x 8 1/2 inch post to the top ( just pick one side) of your 16 patch block. And Press the seam. I wish I could tell you which direction to press, but I didn't pay attention - I just pressed.


~


Then
Sew 1 ~ 2 1/2 inch red square to the top of 30 posts. You will have one red square left - Do Not Throw this away!! Or if you are a plan ahead type quilter - sew it to the other side of one of the posts. You will end up doing this at some time - but since I don't plan to far ahead - I did it last.


Thats the end of step 2.....
~

Do you want to see what the inside of the top ( before borders) looks like? I had a few comments and emails that some were treating this like a mystery. I of course am still playing with the borders. But I got the whole center sewn together this weekend and I really really like it.

Monday, June 01, 2009

Not so Top Secret Project Two Part 1


My 2 1/2 inch scrap bin was overflowing. So I decided that I needed another pattern that used the 2 1/2 inch scraps. This is that pattern. I shall call it the "Not So Top Secret Quilt #2"
~
Especially since I can not keep a quilt a secret - this seems to be an appropriate title. And it can be the second in a series, Since the NSTSP 1 used 2 1/2 inch pieces too!
~
I am not showing you the finished quilt as of yet, because - well mine is not finished. I am having a border conundrum... so I may have to show it to you with the choice of 2 borders.
~
So Step One:
The 16 patch Block.
~
I grabbed my 2 1/2 inch bin and pulled some strips out. Now I have a rather Patriotic looking bin. I randomly pulled strips that were approximately the same length. I sewed four strips together, and then cut them into 2 1/2 inch subcuts. ( Picture 2)
~
You need 18 ~ 16 patch blocks.
~
If you are going to make a 4 color 16 patch you will need approximately 3/8 yard of 4 different fabrics. If you want to use Fat Quarters - you need 288 ~2 1/2 inch squares, and a Fat Quarter will yield approximately 56 ~2 1/2 inch squares each. Which means you need about 6 FQ's... see why I used my bin?
~
After I subcut them, I chose 4 pieces and sewed them together to make the block. I did not try to determine a pattern, I just sewed the strips together and came up with some pretty random, and unrandom blocks. I liked them.

~
Then... are you sitting down for this? I squared up each 16 patch block to 8 1/2 inches in size. I normally don't do this - but I was avoiding chores - so I did, and I will be glad that I did too!

~

Here is a picture of my squared up blocks, and the trimmings. Do NOT put your 2 1/2 inch bin away. You will need it for the next step.
~
So .... it doesn't look to hard so far does it? I will post the next step next Monday... so get to sewing!!

Sunday, May 24, 2009

Rainy day Sunday


It started out sunny, but by the time we got back from Church - the rain was starting. And it has continued.... the kids and dad have been playing cards and legos. I was going to read but I think I might have taken a little nap. Then there were bills to pay, so I guess its a good thing it is still raining.
~
Before school was out, my sons 4th grade class did a biography breakfast. They had to research someone and know lots of facts about them, and make a presentation. They dressed like that person and answered questions from the parents. My son was Bill Gates. He even made a poster that looked a little like the Microsoft logo, and he created a PowerPoint presentation. It was cute. Daniel Boone, John Deere, Henry Ford, and Sacajawea were some of the personalities present!
~
The quilt is a customer quilt. She took a braid class and the quilt was just beautiful. I quilted Swirly feathers on it, I liked it ;-) I think she might have too....
~
And.... surprise surprise - I am working on another Not So Top Secret Project. I shall name it the NSTSP2... because that way I won't get confused. I am challenging myself to do it on point. I don't make many quilts that way - so I thought I would try it and see if I could. So far I haven't come to the "on point" yet - so it is easy!!
~
I will keep you posted. I am hoping it will make a Great Quilt of Valor.
From 2008's Not so Top Secret Project - there were at least 58 given for the soldiers at Fort Carson. I know a few other groups made the pattern and sent them to their chosen location - I LOVE that!! And from the Stars and Bars Pattern there were at least 10 that came in. I still have one in process. So Maybe you all will like the NSTSP2 quilt... and choose to make it for a Quilt of Valor.
`
Have a good one!