http://alyciaquilts.blogspot.com/2015/06/qov-2014-intro-to-next-qal-called.html
There are 6 different blocks in this quilt. It is a simple quilt, with very basic techniques, that comes together in a very striking way. We will do the cutting instructions for each block, and stitch it out before moving on to the next block.
Block 1
You will make 12 blocks of Block 1: BLUE:
Cut 4 * 3 ½ inch width of fabric ( WOF) strips of Blue.
• Sub-cut the strips into 44 – 3 ½ inch squares.
Cut 3 * 4 inch WOF strips.
• *Take 2 strips of this and sub-cut them into 20 - 4 inch squares
• *Take the remaining strip – sub cut it into 4 – 4 inch square.
• *Use the remainder of this strip ( Strip 3) to cut 4 more 3 ½ inch squares with it.
( I don’t like to waste fabrics ;-) )
RED:
Cut 1 * 3 ½ inch WOF strip
• Sub-cut it into 11 3 ½ inch Squares
Cut 3 * 4 inch strips ( WOF)
• Sub-cut 2 strips into 20 – 4 inch squares
• Use the remaining strip to cut 4 – 4 inch squares, and cut one more 3 ½ inch square
If you are using 44 inch wide fabric – you may find that you get more pieces out of the strip, therefore eliminating one of the strips that you cut.
You will need to make 48 ½ square triangles.
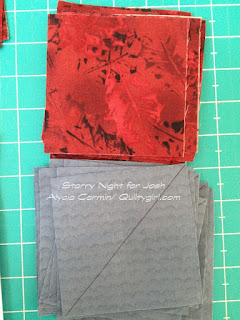
Take 24 of the Red 4 inch squares, and the 24 Blue 4 inch squares. On the wrong side of the Light Blue, take your ruler and draw a line along the diagonal:
Pair the blue with a red square – right sides together.
You will then sew each square twice – ¼ inch off of each edge of the line.
After stitching each square twice – you will use the diagonal line you drew as the cutting line – cut
each block along the line – and you get 2 Half Square BLOCKS
Next we will lay the squares out and start assembling the block:
I stack all of my pieces as if they are a part of the block, and then stitch them into rows:.
Press :
I press the top and bottom row to the outside
and the middle row to the inside
Sew the rows together:
If all worked well - your blocks will be 9 1/2 inches by 9 1/2 inches ;-)
Come back on Saturday to see the next step
PS: This is the most time consuming step - and I don't know how long it takes.... because I was talking with my stitching buddies when I was doing this.... and, well, I sort of forgot to keep track of time.....
Linking up with:
http://www.patchworktimes.com/2015/06/15/design-wall-june-15-2015/
http://www.hugabitquilts.blogspot.com.au/2015/06/2015-new-quilt-bloggers-blog-hop-and.html
http://www.cookingupquilts.com/mcm-23-playing-catch-up/
http://lovelaughquilt.blogspot.com/2015/06/monday-making_14.html
http://ihavetosay.typepad.com/randi/
http://www.conniekresin.com/2015/06/linky-tuesday_16.html
http://www.blossomheartquilts.com/2015/06/sew-cute-tuesday-sunshine-through-the-rain/


It looks like you are using the same blue on this block. Are you using your other blues on other blocks?
ReplyDeleteI just want you to know it is very hard to stay strong when you present such great mystery quilts. I will not start something new, I will not start something new. Yep, I'm all about finishing older projects this year. I have actually started 4 projects this year and two are done and one is well on its way. The fourth one may be relegated to just the blocks completed. I hope lots of people check in and make a quilt for QOV.
ReplyDeleteA great simple star block!
ReplyDeleteThis is such a striking block, really cool looking. I never manage to track my time when sewing because I always get sidetracked and sewing buddies are the best! Thanks for linking up to Main Crush Monday!
ReplyDeleteThey're great blocks! I like the fabrics. This would make a super leader-ender project AND scrap project.
ReplyDeleteHaven't done one in years but I'm looking forward to this one. I'll admit, the story of Josh motivated me.
ReplyDeleteCarlie
Lovely block. Thanks for the tutorial!!! I will try this.
ReplyDeleteAlmost done these blocks after 'unsewing' the center rows. I know better but as they say, stuff happens. Thanks Alicia for this great tribute to Josh for QOV.
ReplyDelete